Pages

Monday, August 12, 2013

DWM: Double Nine Patch

I love nine patch quilts and have been wanting to make a double nine patch for quite awhile.  My original plan was to make a scrappy one, but then I saw this fabric and decided to just do a simple one with four fabrics.  The fabric is Moda’s Wintergreen by 3 Sisters.  The nine patches are going to be red and tan.  I have two black fabrics for alternate blocks, setting triangles and the border.  My original plan was to use the large black print for the alternate blocks and outer border and use the small print for the setting triangles.  The blocks will be set on point and as I was cutting the fabric I saw that the large print is directional and has flower stems and birds.  I think it might bother me to have these directional elements going in the wrong direction.  I’m really bummed because I had a certain plan in my head and I’m not sure it’s going to work out.

I cut a few blocks of both fabrics and auditioned them. 

D9P-1

D9P-2

Since it’s such a simple quilt, the fabric will really make or break it.  I guess I’ll do a little more piecing and then decide, but right now I sure like the large print better.

Check out what everyone else is working on at Patchwork Times.

Technorati Tags: ,,

Sunday, August 11, 2013

Week 32, 2013 Stash Report and Weekly Recap

Another week, another finished quilt!  Woo hoo!  August is proving to be much more productive than the rest of the summer.  It really helps when I have tops all prepped for quilting:  pressed, backing pieced and pressed and batting cut.  That way when I take one quilt off the frame another is all ready to go.  Once the quilt is loaded I can usually finish the quilting in a day or two.

This is the Juggling Summer Wacky Nine Patch.  Now that it’s all finished I really like it.  It was a fun quilt to make.

JugSum-1

I quilted this with randomly spaced straight lines.  I made sure to put a few of them really close together so it’s more obvious that they are various widths apart and not that I just goofed up.

JugSum-6

This week I also finished piecing the “Walk in the Park” top and quilted the Heather Bailey log cabin and an old UFO.  I post pictures and count them in my totals when I finish the binding—should be later this week!

My weekly stats:
Used this week:  7 yards (Juggling Summer)
Used year to date:  219 yards
Purchased this week:  5 (backgrounds)
Purchased year to date: 80 yards
Net year to date:  139 yards used

Check out other stash reports at Patchwork Times.


Friday, August 9, 2013

National Book Lover’s Day-Quilting Style

This is the first quilting book I ever purchased.  Any guesses as to what it is?

Book-1

Like many other people, my first quilting book was The It’s Okay If You Sit On My Quilt Book by the inimitable Mary Ellen Hopkins. 

Book-2

When I heard of her recent passing I thought back to the elation I felt at being able to actually make a quilt and realized that much of my excitement was due to the enthusiasm and charisma of Mary Ellen. She taught us that simple blocks, “kindergarten blocks” as she called them, could make beautiful quilts and ANYBODY could make simple blocks. She embraced the idea that quilts were to be loved to death and then be replaced by another quilt. That was all the encouragement I needed so I started making quilts, lots of quilts. Now, 25 years and nearly a thousand quilts later, my passion is greater than ever.

Looking through this binder was a fun trip down memory lane. Along with the book, there are class handouts from my first quilting classes with another quilting icon, Jackie Robinson. Other fun things in there are fabric swatches from my early quilts, ideas I jotted down for future quilts, practice drawings for machine quilting and more. You gotta love the country blue and dusty pink palette!!

Book-3

After all these years of quilting, I still find inspiration in books. I love to sit down with a new quilting book and dream about my next quilt and then the next one and the next one and….

Recently my focus has been on donation quilts.  Kim Brackett’s Scrap-Basket series has been perfect for stashbusting while making some lovely quilts for charity. The piecing is not difficult and there is a variety of techniques so I don’t get bored. So far I’ve made almost all of the quilts from Scrap-Basket Surprises and will probably work through both Scrap-Basket Sensations and Scrap-Basket Beauties.  All three are great books.

So what quilting books are your favorites?  Do you tend to buy project books or technique books?  Or are you like me and buy them all?   

Be sure to stop by Moda's Cutting Table Blog to check out other favorite quilt books. You can sign up there to win one of six new quilting books!!

With so many great quilting books available I hope you can find your inspiration in one.  

Technorati Tags: ,

Wacky Nine Patch Tutorial

Last night I pulled the Juggling Summer Wacky Nine Patch off the frame and I’m pretty happy with the way it turned out.  It is such a simple pattern and will be great for donation quilts.  I’m sure this isn’t original (it’s too easy!) but it’s a fun way to use a layer cake.

All you need is one layer cake for a quilt that ends up about 52” x 60”.  To finish your quilt you’ll need 3-1/3 yards of backing and 1/2 yard of binding.  You could add borders if you want to make it bigger.  If you add borders, you’ll need more fabric for backing and binding.

For my quilt I used a Moda Juggling Summer Layer Cake by Zen Chic.

jug sum-lc

Make two cuts through each fabric square so you end up with three strips.  I cut my strips 2”, 3” and 5”.

JS-cut 1

Cut all 42 squares the same way.  I layered my up and cut six at a time.  Keep each size of strip together in a stack.

JS-all cut

Now you’re ready to sew. Select one strip from each stack and sew them together.  Mix up your fabrics so you have three different ones in each block.

JS-stripset-1

It doesn't matter which order you sew the strips.  Mix it up and make different strip sets.

JS-stripset-2

JS-stripset-3

The order doesn’t matter as long as you have one of each size in every strip set. When all your blocks are sewn, go to the ironing board and press the seams in any direction.  You won’t be matching seams so you don’t have to press in any certain direction.

When you’re finished pressing, take the blocks back to the cutting table and again make two cuts in each block so you end up with three strips again.  Make sure you cut perpendicular to the seams.

JS-2nd cut

Again, cut all 42 blocks like this and keep the strips together.  When you have them all cut, take them back to your machine and sew the strips back together like you did before.  Voila!  A wacky nine patch!

JS-Block 1

Sew these strips together in different order too.  Just make sure you have one of each size strip in every block.  When your blocks are sewn, press the seams.  Again, it doesn’t matter which direction your press. 

You will end up with a variety of different blocks.  Here are a few of my variations—yours won’t necessarily look like mine.

JS block variations

Now lay out your blocks in seven rows of six blocks each.  You can rotate the blocks in any direction you choose.  Sew the blocks together into rows, the sew the rows together.  Now just press the seams and your top is finished. 

I quilted mine in straight rows random widths apart.  When you’ve finished quilting, bind and enjoy your new quilt!
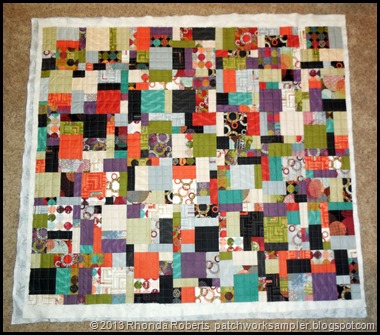
JS-top

Now I’m off to sew binding!!  Hope you have fun with this project.