Pages

Saturday, March 9, 2013

Bundle of 10 top almost finished

A week or so ago I was browsing through the downloadable quilt patterns on Craftsy and came across one called “Bundle of 10” that (obviously!) uses 10 fat quarters.  Since I have approximately one million fat quarters in my basement I bought it, along with it’s sibling, “Bundle of 12.”  There were a few fat quarter bundles in the box of stuff I’m trying to use up so I combined a couple of them and got busy making Bundle of 10.  It was super easy to cut and piece and everything fit together very nicely.  My only caution regarding this pattern is that your fat quarters MUST be 18” wide.  You are using the entire 18” so there’s no room for error and if your local quilt shop cuts 18” and only 18”, you will not be able to square up the edges and have enough fabric.  It wasn’t an issue with my fats though and it all worked out fine.

I had hoped to have this on the frame for quilting by now but ended up filling in at work a couple of days so didn’t have as much time to sew this week as I’d hoped.  This morning I got the top pieced together so it’s ready for binding.  My kids surprised me by both coming home this weekend.  It’s fun to have them here and I’d much rather spend my time with them than at the sewing machine—that’s sure changed from when they were little and I used to escape from them by sewing. Haha!

Here’s the top before borders.  If you’d like to purchase this pattern, click here: Bundle of 10

bundle of 10

Friday, March 8, 2013

Finish #2 from the “box of stuff”

This quilt started out as a jelly roll of strips.  I’m not sure where I picked this up but it was during my road trip last fall. I got a couple of these rolls and some fat quarter packs to use for donation quilts.  They were a bargain, but don’t have the variety of fabrics that most jelly rolls have.  I wanted to make this twin size so I added a few strips from stash and added extra border on the top and bottom to make it a little longer.  Overall, I’m pretty pleased with how it turned out.

Rose-Lime Rail Fence

Most of the blocks are rail fence blocks but I didn’t want to waste any fabric (or have any leftover) so I used the ends of the strip set to make some 16-patch blocks to mix in.  I quilted it in an overall swirl and crescent design.  I used Signature thread in Latte and I love how it looks on the brown sashing—like caramel on chocolate!

Rose-Lime Rail Fence-detail

When finishing quilts for Quilts Beyond Borders they request that binding be completely sewn by machine (front and back).  I had only done this a couple of times before but since doing it several times now I’m happy with the results and plan to do this on all my donation quilts from now on.  I can finish them faster and they will be more durable for heavy use and laundering.

Here’s a quick tutorial on how I make the binding.

First, trim the extra batting and binding close to the edge of the quilt.  I leave about 1/8” extra all the way around the quilt.

After preparing the binding strips, sew the binding to the BACK of the quilt using a 1/4” seam from the edge of the binding.
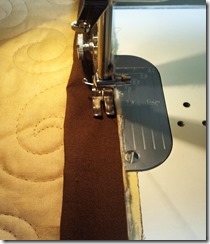
binding tut-1

When you get to the corner, miter the same as you would if you were sewing it to the front.

binding tut-2

After the binding is sewn completely around the quilt, turn the quilt over and bring the binding around to the front.  Match the top thread to the binding and the bobbin to the back.  Top stitch the binding on the front of the quilt.  I pull it around so it’s slightly to the left of the seam line.  Sew slowly so you catch the binding and can hold it in place while you stitch.  I use a stiletto to hold it down all the way to the needle.  That way it stays nice and straight!

binding tut-3

When you get to the corner, pull the bottom up first, then fold the right side over to make the miter.  Then hold it in place with the stiletto until you sew it down.

binding tut-4

Continue all the way around the quilt, then celebrate a finished quilt!!
Here’s what it looks like on the front when you’re finished:
binding tut-5


And here’s the back.
binding tut-6

It looks pretty good!  I enjoy hand stitching the binding down, but this is a real time saver when trying to get quilts ready for donation.

Thursday, March 7, 2013

Ta Da! QBB Quilts Finished

It took a little longer than I thought but this batch of six quilts for Quilts Beyond Borders will go out in tomorrow’s mail.  I finished quilting and binding the last three this week and am on the list to receive six more so I’ll get plenty of quilting practice!  With this program, the quilter received the quilt tops, backing fabric and binding fabric so we don’t know what the quilts look like until they arrive.  There is always a wide variety of styles and colors.  This batch was no exception.  Overall, I think they are very nice and will be well-loved by their recipients.

This one is a cute little panel—no piecing involved!

QBB-4

I quilted it in a simple allover meander.

QBB-4-detail

This one has alternating blocks of blue rectangles with a red, white and blue star fabric.  There were several different blue prints used in the quilt and to be honest, this created a bit of a challenge to quilt.  I’m not sure if it was the different textures of fabrics or something else, but my thread kept breaking.  My machine really didn’t like the seam in the back and would skip stitches every time I went over it.  After it was finished though, I liked the way it turned out.

QBB-5

Fortunately, I didn’t try anything fancier than an overall meander.  It would have driven me crazy with all the problems I had with it.

QBB-5-detail

The last one I worked on turned out really pretty.  It had a focal print in the center surrounded by a pink border and a tropical fish print. 

QBB-6

I quilted this in an allover water pattern.

QBB-6-detail

Tomorrow I hope to have some time to get back to my projects.  I’m ready to put the borders on the Pineapple Blossom quilt.  The bonus triangle top is also ready to piece and I have the blocks cut out for the quilt I’m making with the extra flying geese from the Buffalo Ridge quilt.  Always lots of projects in the sewing room and not enough time to finish them!

Tuesday, March 5, 2013

Design Wall Monday-Pineapple Blossom Blocks

I've been following Judy Laquidara's blog at Patchwork Times for quite awhile and thought it would be great motivation to show what I'm working on for Design Wall Mondays.

It took awhile but the blocks are finished and I just auditioned a layout on my design floor.  I think I’m really going to like this quilt. This week I have quite a bit of time for sewing so I hope to finish this quilt before my sewing group meets next week. I’m still quilting the rail fence quilt that’s on the frame and need to quilt and bind the last two for Quilts Beyond Borders so it may not happen. 
pb blocks
There’s also the bonus triangles to deal with.  I’d like to get those into a quilt right away.  Otherwise they just languish in the sewing room and I’ll probably never use them.  Here’s a sneak peak of my idea of how to use them.
pb hst